Setup

Setup

Welcome to my setup! Here you should find everything there is to know about my setup. This includes my home office gear, how everything is plugged in between my machines, my homelab / home network hardware, as well as my typical workflow with tools, configs, etc etc… Obviously workflow side can change rapidly, but I will try to keep this document as up to date as possible, with links to all my config source code.

Enjoy! 🎉

Hardware

Computers

Sherlock

Sherlock is what I call my personal Desktop PC. It’s a custom-built PC running dual-boot Windows 11 / some flavor of linux.
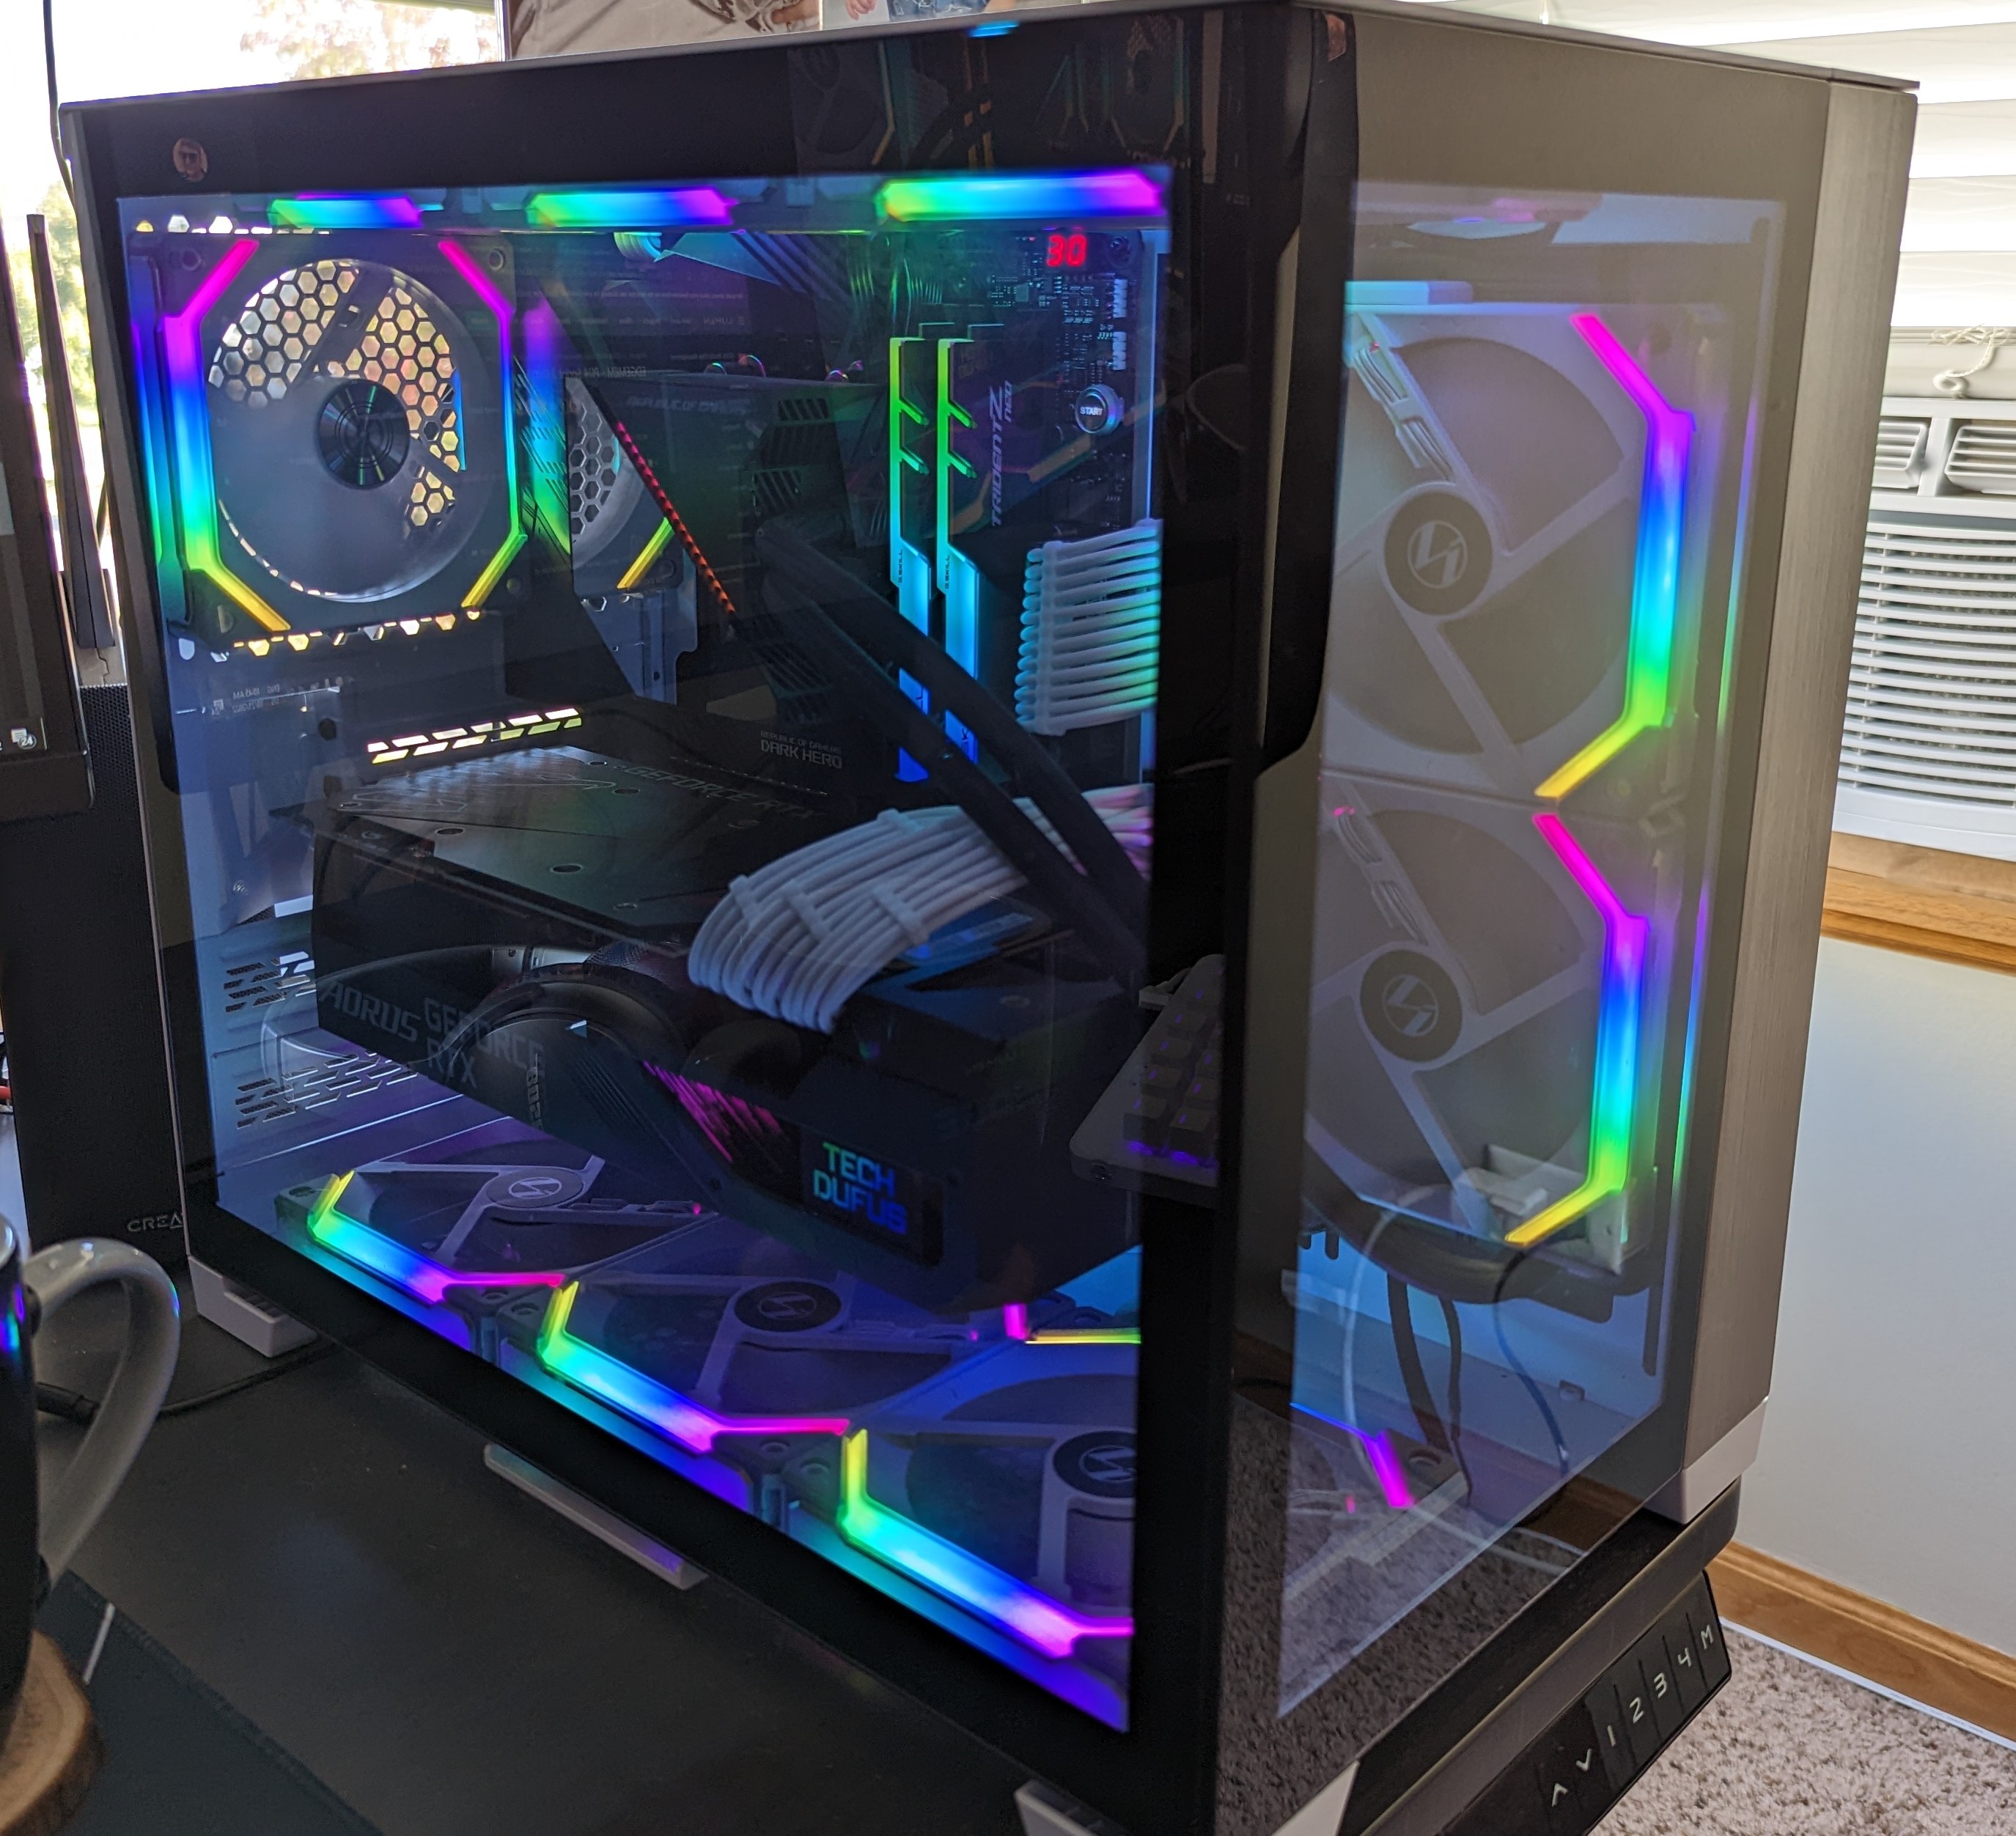
Component Item
CPU AMD Ryzen 9 5950X 16-core, 32-Thread
GPU AORUS GeForce RTX™ 3080 MASTER 10G (rev. 3.0)
RAM G.SKILL Trident Z Neo 16GB x4 (64GB Total)
Motherboard ASUS ROG Crosshair VIII Dark Hero AMD AM4 X570S Zen 3
CPU Cooler ASUS ROG Ryujin 240 RGB AIO Liquic CPU Cooler 240mm Radiator
Case Lian-Li Case O11D Mini -W Mid-Tower White ATX/Micro-ATX/Mini-ITX
Case Fans Lian Li UNI Fan SL 120 White
Hard Drive Primary: Samsung 980 PRO SSD 1TB PCIe 4.0 NVMe Gen 4
Hard Drive Secondary: Samsung 980 PRO SSD 500GB PCIe 4.0 NVMe Gen 4
Power Supply Cooler Master V850 SFX Gold Full Modular, 850W, 80+ Gold
Custom Cables Etsy CoolerMaster PSU Cables - White

M3 MacBook Pro - Nov 2023

This is the M3 MacBook Pro (14-inch, M3, Nov 2023).

Intel MacBook Pro - Mid 2015

This is the Intel MacBook Pro (Retina, 15-inch, Mid 2015).
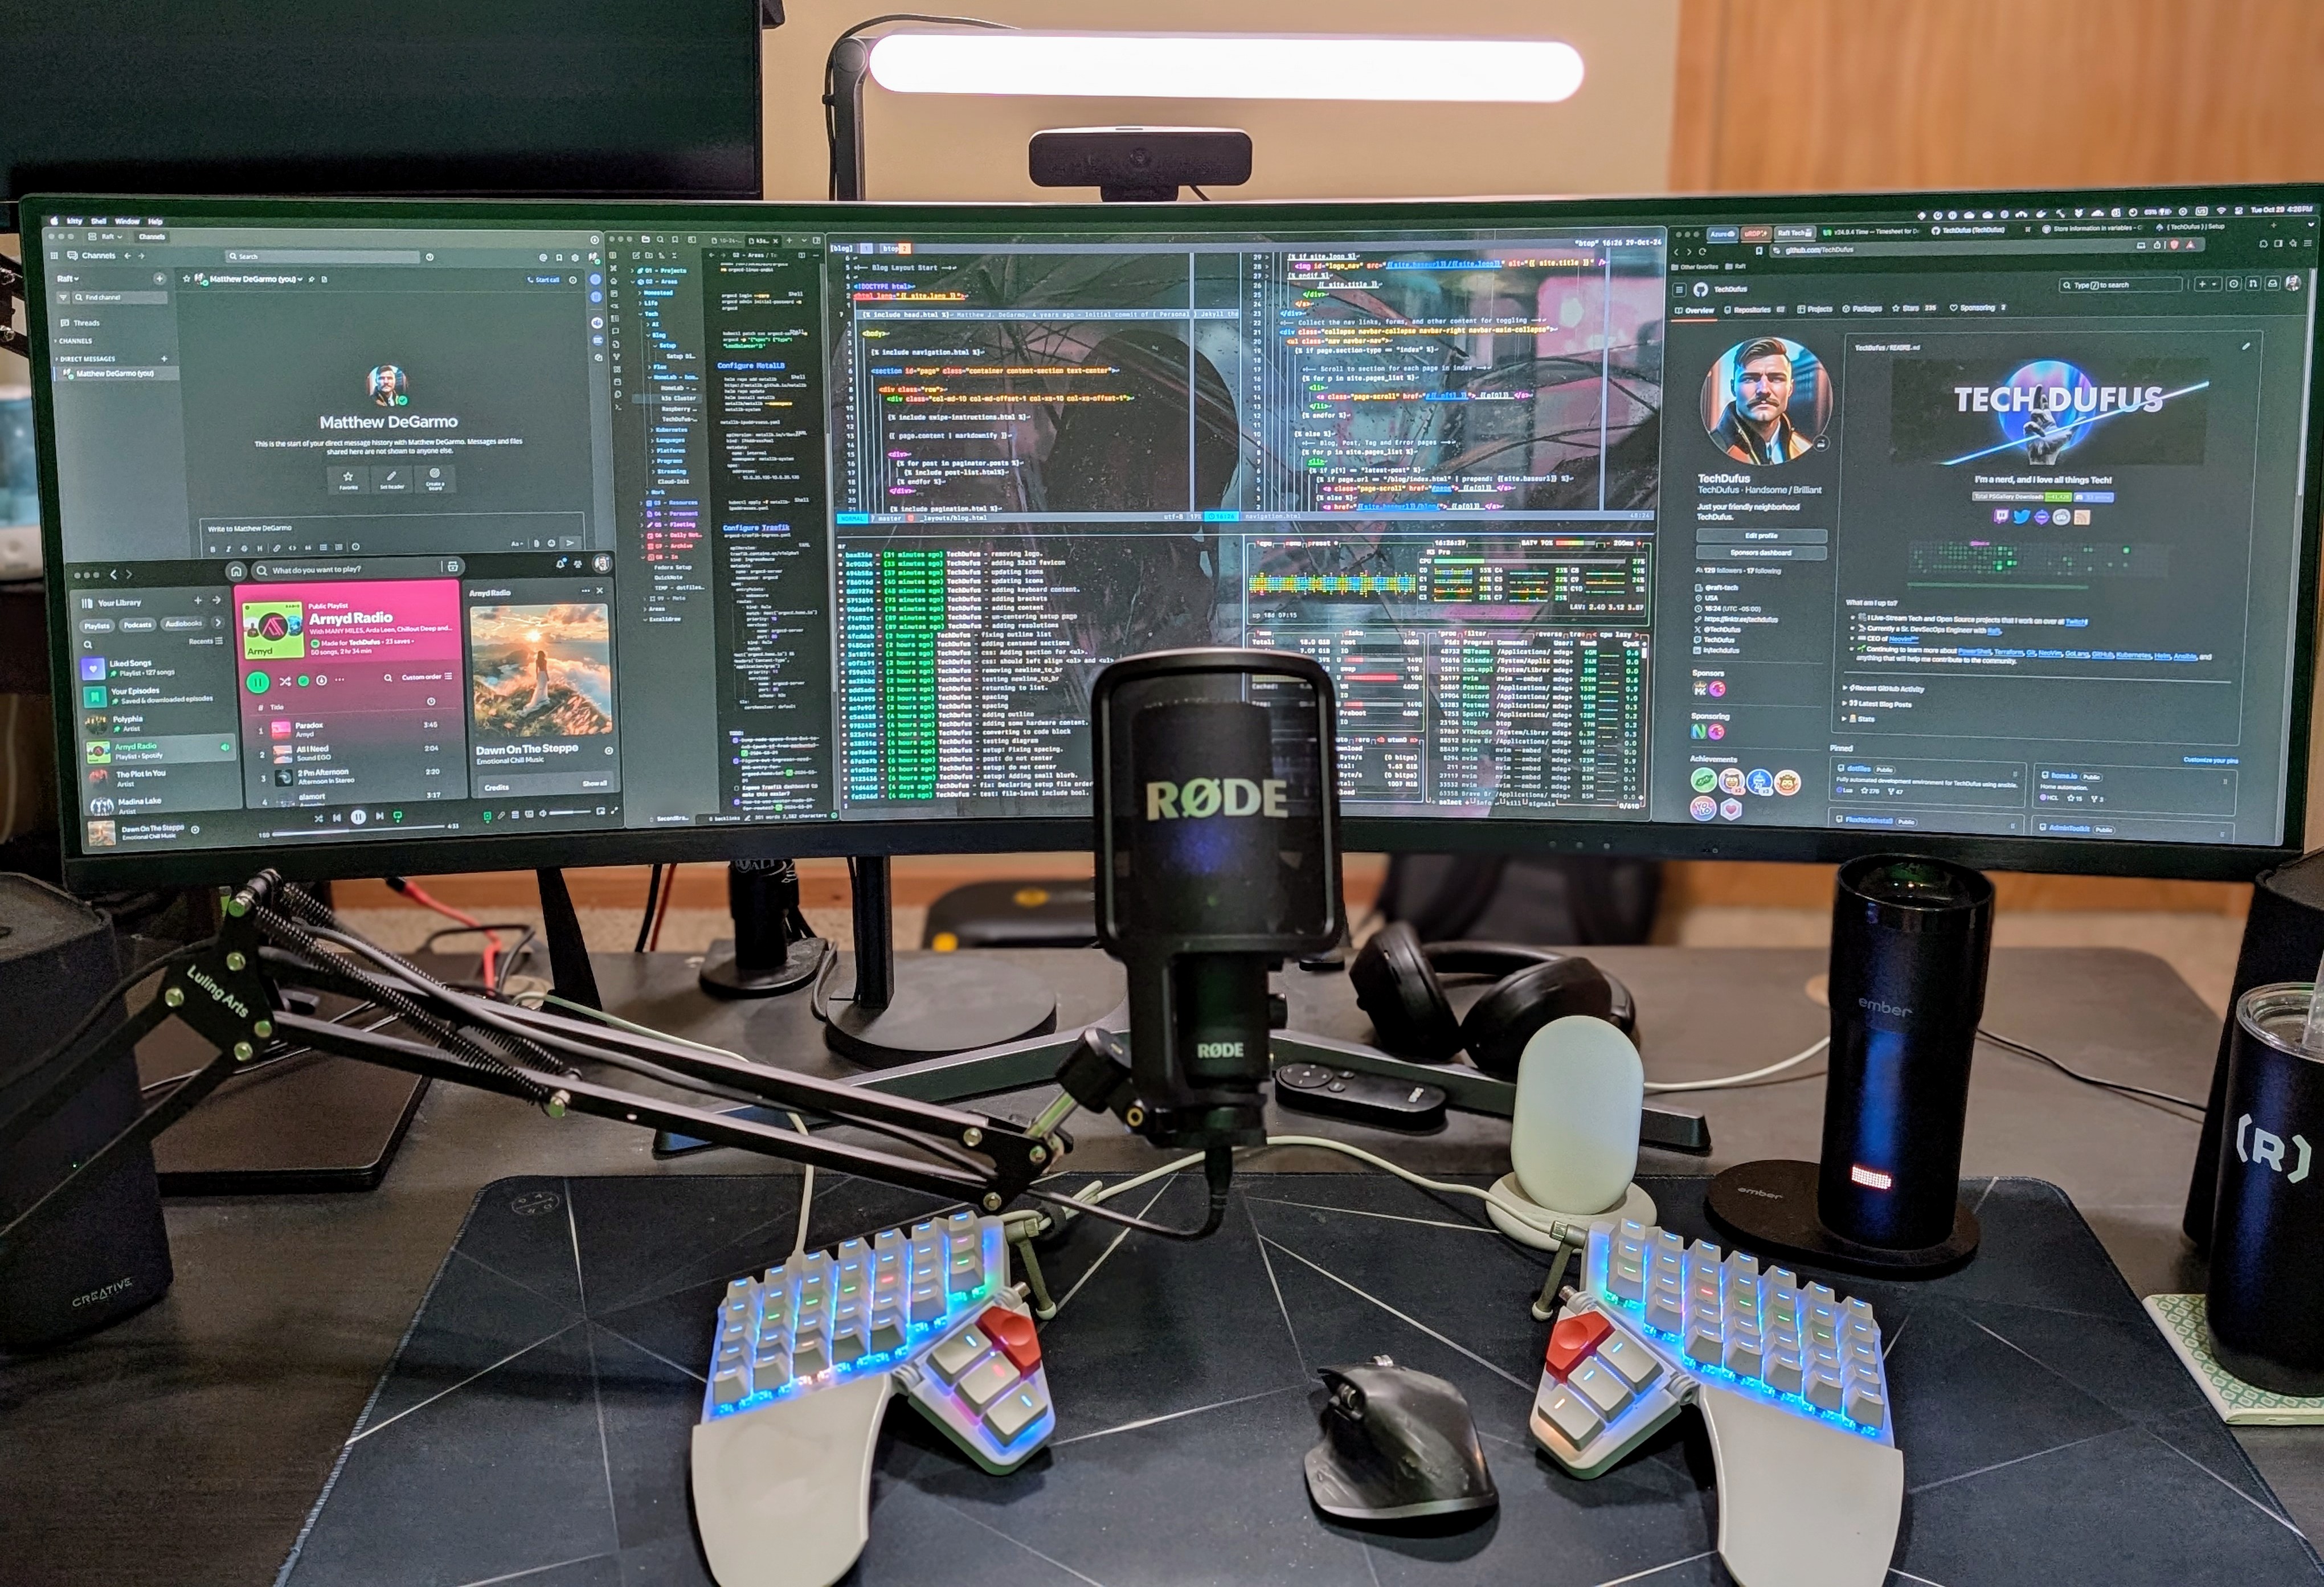
Monitors

I have 3 monitors currently, But I am actually only using the CRG9 at the moment. This helps me stay more focussed. Though it is annoying never being able to share my whole screen on meetings since it’s so huge, I am forced to switch between sharing individual apps.

I’ve always wanted to try a single 4k or 5k display with a normal aspect ratio (not super-ultrawide), but being on MacOS and having my current window manager (Hammerspoon/GridLayout) I am really settling into this CRG9

Peripherals

Microphone

I just received the Rode NT-USB+ Microphone and I sure love it. I used to use the Logitech Yeti X, but after a few years it lost it’s luster, and for good reason.

The Logitech Yeti X requires the Logitech G HUB program running for anything magical to happen. All digital processing is done via the G HUB application. On top of this, there is no settings sync between computers, which means I’ve always had to install G HUB on each computer, tweak EVERY LITTLE SETTING to hopefully get things to match between computers. It was just a hastle…

With the Rode NT-USB+ Microphone, ALL processing happens within the mic. That means I have all my mic settings and functions no matter what device I plug it into, and does not require a running program on the computer either.

Keyboard

I currently rock the ZSA Moonlander MRK I and LOVE it. I use a custom DVORAK keyboard layout.

ZSA comes with their ORYX layout editor, which I use create my configuration for my layout.

There is a lot about my keyboard config that lends itself to my workflow tooling like [hammerspoon/gridlayout] for my window manager (f13 and f16 keys).

Originally I wanted to buy the Kenesis Advantage360 Professional but it was sold out at the time and I didn’t want to wait, so I went with the Moonlander. I’m VERY happy with the Moonlander, but if I needed to buy another keyboard I’d be torn between the two, Unless ZSA comes out with a MRK II that fixes some of my issues with the Moonlander, then it’d be a no-brainer for me.

Than brings me to….

Keyboard Issues

I do have some issues with the Moonlander as it is.

  1. Portability. Why am I required to use an alan wrench in order to loosen / collapse the thumb clusters in order to store the keyboard in it’s travel case?
  2. I wish the Moonlander was able to tent more with the stock configuration. I know this is probably a hard problem to solve, but 3D printing your own custom tent kit is just not an option for everyone. I think there’s a place where you can buy a nice metal tent kit, but it seems bulky and doesn’t lent itself to my first issue above in regards to being portable.

Mouse

I use the Logitech MX Master3 and have for about 3 years now. Every now and then the horizontal scroll doesn’t seem to want to work right, but with my workflow becoming more and more mouse-independent, I could probably use any mouse since I rarely reach for it.

Webcam

I currently have 2 webcams. One is my main one, and the other I have that I used to play with extra OBS scenes / angles for streaming.

Both of these cameras are okay. I would only consider upgrading if I wanted something that was 1080p 60hz or better.

Speakers

I have used the Creative T100 Speakers for a few years now and they have some pretty stellar sound. No complaints here.

Headphones

I use the Sony WH-1000XM5’s. I’m a big fan of noise cancelling headphones since my office is pretty noisy. The room next-door is our HVAC, I have a portable A/C unit, walking pad, air purifier, and children all make a lot of noise which necessitates noise-cancelling vs. open-ear style headphones.

My last pair that I used for YEARS was the Bose QuietComfort 35 II headphones which were great, but just getting old and worn.

Software

My entire development environment lives in my dotfiles repository - 76 Ansible roles that configure everything from terminal emulators to cloud CLIs. Rather than list every tool, let me walk you through how I actually work.

The Terminal is Home

I spend 95% of my time in the terminal. My setup is designed for speed and muscle memory - the same keybinds work whether I’m on my Ubuntu workstation or MacBook.

Starting a Session

When I sit down to work, I open Ghostty - a GPU-accelerated terminal that’s fast enough to keep up with my typing. From there, I hit <prefix>-o to launch sesh - a session manager that ties everything together.

The sesh + tmux Workflow

Sesh is the command center for my tmux workflow. <prefix>-o opens an fzf popup where I can:

  • ^a - List all sessions
  • ^t - Filter to tmux sessions only
  • ^x - Browse zoxide’s frecent directories (create new session on select)
  • ^g - Jump to config directories
  • ^f - fd-based directory search for anywhere else
  • ^d - Kill a session without leaving the picker

sesh picker showing fzf interface with keybind hints and session list

This means I never manually create sessions or cd around. I just hit <prefix>-o, fuzzy find where I want to be, and sesh either attaches to an existing session or creates one in that directory.

Sessions persist through reboots thanks to tmux-resurrect and tmux-continuum - I never lose my window layouts or working directories.

For navigation within tmux:

  • Ctrl+hjkl - Navigate panes (vim-tmux-navigator makes this seamless with neovim splits)
  • <prefix>-S - Synchronize panes (type in all panes at once)

The Status Bar

My tmux status bar shows:

  • Current session name (highlights red when prefix is active)
  • Current directory + git branch
  • Zoom indicator when a pane is maximized
  • Claude status - shows whether Claude Code is working, done, or idle
  • Online/offline indicator

tmux status bar showing session name, directory, window tabs, Claude status, and online indicator

The Editor: Neovim

I live in Neovim with a heavily customized config. My setup includes:

  • Telescope for fuzzy finding files, grep, and LSP symbols
  • LSP configured for Go, Terraform, YAML, Bash, and more
  • Treesitter for syntax highlighting and text objects
  • vim-tmux-navigator for seamless pane/split navigation

I don’t use a file tree - Telescope is faster. My most-used keybinds:

  • <leader>fs - File Search (uses git files when available)
  • <leader>gs - Grep Search (live ripgrep across project)
  • <leader>b - Switch Buffers
  • <leader>fr - Files Recent
  • / - Fuzzy search in current buffer

Window Management

I use AwesomeWM on Linux and Hammerspoon on macOS - but not as traditional tiling window managers. Instead, I built a cell-based system where I predefine screen regions and assign apps to specific cells.

The concept: An 80x40 virtual grid (resolution-independent) with named cells. Each app is assigned a cell and a summon key.

Summon: Press Hyper+letter and the app instantly appears in its designated cell. If it’s already running, it focuses and repositions. If it’s not running, it launches directly into position. No hunting through windows, no Alt+Tab cycling - just summon what you need, where you need it.

4K Workspace layout:

Cell-based window layout showing 5 predefined screen regions

Cell App Summon
1 Terminal t
2 Browser b
3 Discord d
4 Spotify / 1Password s / o
5 FileManager f
6 Obsidian n

I can switch between layouts (4K Workspace, Standard Dev, Fullscreen) and all apps reposition to their new cells. No dragging, no resizing - just instant, predictable window placement.

The Shell Stack

My shell is zsh with a customized Powerlevel10k prompt. The real power comes from custom functions I’ve written that wrap complex workflows into single commands.

Git functions (fzf-powered with previews):

  • gs - Quick git status
  • gss - Enhanced status showing branch, PR status, worktrees, stash count
  • gtags - Interactive tag browser
  • glog - Commit browser with full diff preview
  • gacp <msg> - Add all → commit (signed) → push in one command

Kubernetes aliases:

  • kgp - kubectl get pods (args pass through: kgp -A, kgp -n foo)
  • kgn - kubectl get nodes
  • kc - kubectl config use-context (with tab completion)
  • k9s - My go-to for cluster interaction

Remote editing:

  • nisshfs <server> - Mount via SSHFS → open in neovim → auto-unmount on exit

Development Tools

For day-to-day development, my most-used tools are:

  • gh - GitHub CLI for PRs, issues, and Actions
  • podman - Container runtime (no Docker, no GUIs)

Infrastructure Tools

Working in DevOps, I interact with infrastructure constantly:

  • Terraform + Terragrunt - Infrastructure as Code
  • Helm - Kubernetes package management
  • kubectl - Kubernetes CLI
  • AWS/Azure CLIs - Cloud provider interaction

AI Tools

Claude Code is integrated into my terminal workflow with a custom configuration that includes:

  • Custom hooks that update my tmux status bar (working/done/idle)
  • Slash commands for common workflows
  • Skills for specialized tasks
  • Memory files for project context

The tmux integration means I always know at a glance whether Claude is processing something.

The Philosophy

My setup optimizes for:

  1. Speed - Every tool is chosen for performance
  2. Consistency - Same experience on any machine
  3. Keyboard-first - Mouse is a last resort
  4. Reproducibility - dotfiles rebuilds everything

Everything is documented and version controlled. If my laptop dies tomorrow, I can have an identical environment running in under an hour.


Want the actual configs? Check out my dotfiles repo - it’s all there.

Homelab

My homelab is a production-grade infrastructure running in a 42U enclosed server rack. Everything is deployed via GitOps - no manual configuration, no snowflakes.

Hardware

Component Specs
Compute Dell PowerEdge R720xd (40 threads, 256GB ECC RAM)
Network UniFi UDM Pro + U7 WiFi AP
Storage UNAS Pro 8 (8-bay NAS)
Edge Raspberry Pi 4B (8GB)

Architecture

The heart of my homelab is a 3-node Talos Kubernetes cluster running on Proxmox VE. I chose Talos for its immutable, API-driven design - no SSH, no package managers, just declarative configuration.

Stack Overview:

  • Hypervisor: Proxmox VE
  • Kubernetes: Talos Linux
  • GitOps: ArgoCD deploys everything from git
  • Ingress: Traefik + Cloudflare Tunnels (HA with 2 replicas)
  • Networking: MetalLB for load balancing, Pi-hole for DNS
  • Storage: CloudNativePG operator, local-path provisioner, NFS

What’s Running

I run 25+ production services including:

  • Immich - Self-hosted Google Photos replacement
  • Homepage/Dashy - Dashboard for all services
  • Self-hosted GitHub Actions runners - CI/CD on my own hardware
  • Full observability stack - Prometheus, Grafana, AlertManager

Infrastructure as Code

The entire homelab is defined in my home.io repository:

  • Terraform provisions Proxmox VMs
  • Ansible bootstraps the base OS
  • ArgoCD deploys all Kubernetes workloads

If my rack catches fire, I can rebuild the entire infrastructure from git.


Want to see the actual configs? Everything is public at github.com/TechDufus/home.io.