
In this post, we will be diving into a more advanced way of creating and structuring our PowerShell modules.
If you haven’t yet, please head over and check out my How to organize your powershell functions into a module - Part 1 post where we look into the bare necessities of creating a PowerShell module. The example module, public functions, and private functions used in this Part 2 post will be the example MyADUtils module we used in the Part 1 post.
Before we get into the details, I want to make this statement; There is no “best” way to create a module…
Well.. really it depends. There certainly are some best practices, but which best practice you use depends on the complexity and requirements of your module. If you are making a module with only three functions, you are probably okay to just create a .psm1 and .psd1 file pair. For more complex modules, like the Azure module with hundreds of functions, and who knows how many private functions, classes, formats, help files, etc. are being used also. It’s hard to manage that in just a couple files!
Although there are many different structures, I’d like to share my standard structure that my modules will be using going forward, and will deviate from it where I feel I need to. This may not be what you need, but it really helps me understand the structure of my modules, and makes it easier to manage my code, add functions, hide others, etc.
So, let us begin.
We will be discussing the following topics:
- Dot-sourcing
- Public vs Private folder structure
- Basic Maintinance
- License Information
Dot-Sourcing Technique
This module structure relies on dot-sourcing other powershell .ps1 files. Instead of placing all of our functions into a large single .psm1 file, we will be creating a separate .ps1 file for each function that we create, with the function definition inside.
Dot-Sourcing is a technique that allows you to bring the content of a file into the session where it is dot-sourced. When you dot-source a file, it is as if you crack open that file and copy/paste it into your powershell session. This is called dot-sourcing due to how it is actually implemented, you literally put a dot (period) before the path to the file you are waiting to “copy/paste” into your session.
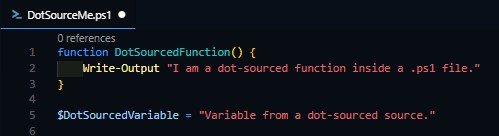
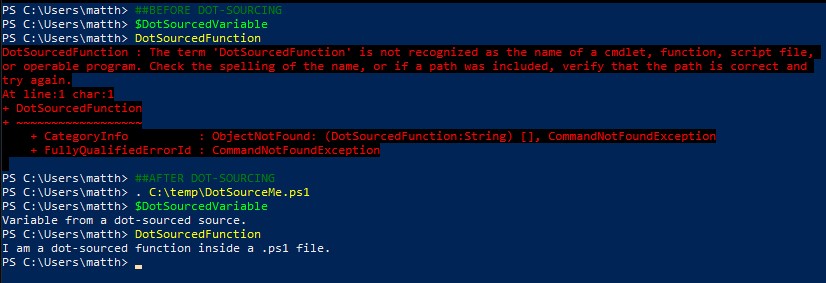
Figure 1-2 - Dot-Sourcing a Function from a File
As you can see, the function and variable is defined within the .ps1 file, and after we dot-source that file, we are able to use that function and the variable that was defined. This technique will be the core of how we import our module. Let’s take a look at the full module structure, and we can tackle these concepts piece by piece.
Public vs Private Folder Structure
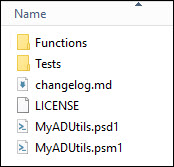
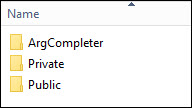
Figure 3-4 - Module File & Folder Structure
└───MyADUtils
    │   changelog.md
    │   LICENSE
    │   MyADUtils.psd1
    │   MyADUtils.psm1
    │
    └───Tests
    └───Functions
        ├───ArgCompleter
        ├───Private
        └───Public
As you can see, we have our same MyADUtils.psd1 and MyADUtils.psm1 files together, as well as some folders, and even more ‘metadata’ in the form of a License and a changelog to track your changes. Since there are many other types of tools, objects, tests, and resources that we can package up with our module, I like having a Functions folder, where we will be keeping our functions, both Public ones that we will export, and Private ones which are our helper functions that stay hidden. I also like having a Tests folder where I keep my Pester tests, but Pester is a topic for another blog post.
Again, a topic for another blog post, but I also include an ArgCompleter folder within my Functions folder. This is where I can define custom Tab-Completion for my functions and parameters.
OKAY NO MORE RABBIT HOLES
Let’s discuss how our functions and files will fit into this new architecture. if we reference Figure 1, we can see that inside of the file is the function definition. So to continue with our MyADUtils example, we will make three files, and place them into the \Functions\Public folder like so.
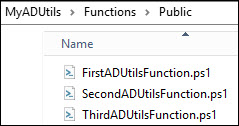 Figure 5 - Public Function Files
Once we have these files, we will place their respective functions inside each file.
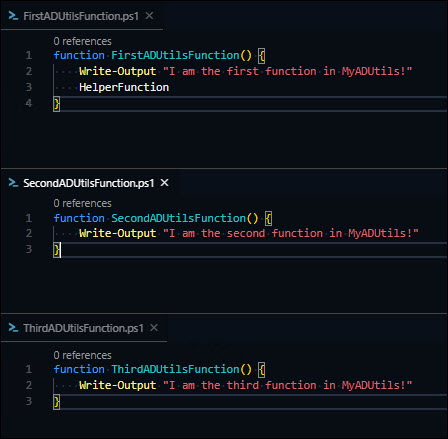 Figure 6 - Public Function Definitions
In Figure 6, I have each of the files open, and have put the function definition inside and saved each file. Now when we dot-source these files, we will be able to use the functions within each.
But how are we going to dot-source these functions exactly? Certainly not manually? This is where the .psm1 module file comes in. Since we are defining the module functions in their own files, we will use the module file to do the dot-sourcing for us. That will look something like this…
Inside of the MyADUtils.psm1 file…
$PublicFunctionsFiles = [System.IO.Path]::Combine($PSScriptRoot,"Functions","Public","*.ps1")
Get-ChildItem -Path $PublicFunctionsFiles -Exclude *.tests.ps1, *profile.ps1 | ForEach-Object {
    try {
        . $_.FullName
    } catch {
        Write-Warning "$($_.Exception.Message)"
    }
}
There are several things going on here, but at the core, we are getting all files inside of our Functions\Public folder using Get-ChildItem and dot-sourcing each of them using a ForEach-Object loop. The reason I create the module path using $PublicFunctionsFiles is so that no matter what Operating System is using this module, it will work. Since Windows uses the backslash ‘\’ and the rest of the world uses a forwardslash ‘/’ in paths, using this method will automatically create a path no matter what OS we are on, using the correct slashes.
Once we have this in place, we will be able to run Import-Module for this module, and the .psm1 file will dot-source all of our public functions for us! (I’m assuming that you have the MyADUtils.psd1 manifest file from Part 1, which is exporting these three functions.)
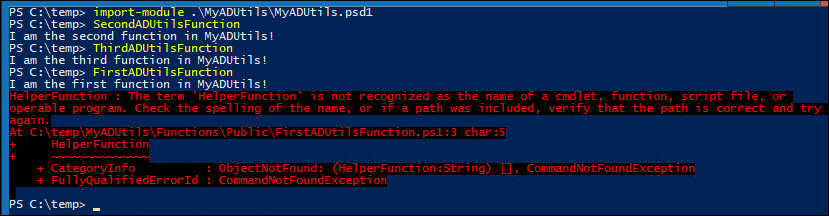 Figure 7 - Importing a Dot-Sourcing Module
Horray! We are successfully able to import and use our functions! Instead of having to crack open the .psm1 file and find where the function is defined to make any changes, we can simply locate the public .ps1 file and make our changes there. For only three functions, this is a bit overkill, but imaging we have 60 different functions, each in their own files, some are public, some are private, others are pester tests, class definitions, format files, etc. You can see how having a structure like this makes it so easy to have a bird’s eye view of what is going on, and when you need to change, or add anything, you know exactly where to go.
BUT, notice the error in Figure 7 when we call FirstADUtilsFunction, There is no function HelperFunction defined. Let’s take care of this by creating a Private file for this function.
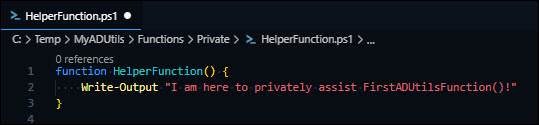 Figure 8 - Private Function Definition
We will create a new .ps1 file inside of our Functions\Private folder named after the function, and define the function inside the file.
Now when we go to use FirstADUtilsFunction…
 Figure 9 - Failing Private Function
But… Why did this fail? The Private HelperFunction function is in the correct folder.
Well, we are not dot-sourcing the Functions\Private folder from inside our .psm1 module file. Remember, we only put in a loop for the public functions. Let’s go fix that!
Your MyADUtils.psm1 module should now look like this.
$PublicFunctionsFiles = [System.IO.Path]::Combine($PSScriptRoot,"Functions","Public","*.ps1")
Get-ChildItem -Path $PublicFunctionsFiles -Exclude *.tests.ps1, *profile.ps1 | ForEach-Object {
    try {
        . $_.FullName
    } catch {
        Write-Warning "$($_.Exception.Message)"
    }
}

$PrivateFunctionsFiles = [System.IO.Path]::Combine($PSScriptRoot,"Functions","Private","*.ps1")
Get-ChildItem -Path $PrivateFunctionsFiles -Exclude *.tests.ps1, *profile.ps1 | ForEach-Object {
    try {
        . $_.FullName
    } catch {
        Write-Warning "$($_.Exception.Message)"
    }
}
Notice we have two loops now, one configured for our Public folder, and another for our Private folder. Great! We are now correctly dot-sourcing our Private folder!
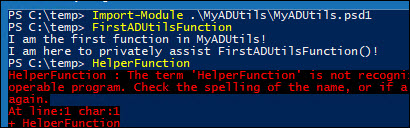 Figure 10 - Working Private Function Reference
Now FirstADUtilsFunction is able to call the private function HelperFunction but we are not able to call this from our session.
Whew! That was a lot, and I hope you have a better idea of how useful having an organized module structure like this can be helpful.
Basic Maintinance
So at this point, we have recreated the same module functionality that we ended the Part 1 post with. Now we need to discuss some maintinance items.
Notice how when we added the HelperFunction.ps1 file, we didn’t have to do anything else, it was immediately accessible for our public functions to reference (since we have the Private ForEach-Object loop in our .psm1 file). But what about if we want to add another Public function?
We still need to create the .ps1 file in the Public folder, and define the function inside, but there is one more step we will need to do to have this function usable from the user’s session. Do you know what that is?
We will need to declare in the Manifest .psd1 file that we want to export that function! Let’s crack open the MyADUtils.psd1 file and find the FunctionToExport section, and add your new function name, making sure you keep it an array and comma-seperated.
 Figure 11 - Adding a Pubic Function to the Manifest
And that’s it! Save the Manifest .psd1 file and viola, that function will be available to use!
License Information
If you are going to be writing code and sharing it for others to use, it is important to provide a license, so they know what they can or cannot do with the code.
If you plan on making your code Open Source, there are several license templates to choose from. Head on over to OpenSource.org and check out their different templates.
But, if you are writing modules within your organization, and your code is proprietary and not to be distributed outside of your organization, it would be a good idea to work with your legal department (if you have one) on a proper license that will ensure your organization has rights to the code, should it be misused in any way.
Basically everyone in the PowerShell community are rock stars, and provide their code for free under the MIT license, which is what I will be using as well.
You did it…
If you’ve made it this far, you are a real trooper. I hope the information I’ve shared helps inspire you into learning more and digging deeper into PowerShell and what it has to offer. Perhaps you can even research some topics I meantioned but didn’t explain like Pester and Argument Auto-Completion.
I recently attended the Chicago Powershell Conference which was a fantastic event! During one of the sessions, Jeff Hicks gave a presentation Building a Better Module Structure which was fantactic, and very well-timed as I was putting this Part 2 post together. It helped reinforce that I was in-line with other’s best practices for module development.
Towards the end of his presentation, he dropped a gold nugget on us. He created several functions that will automatically build out a base module structure for you, including the License, changelog, and any other folders you need! I have taken his code from Make-Module.ps1 and added a bit of my own, including some of the dynamic path creation used in this post, and some other things. Plus I have yet to make a GitHub Gist, so this is a great excuse to do that! I have posted my slightly adapted version of Jeff Hick’s code here. matthewjdegarmo’s New-ModuelBase.ps1
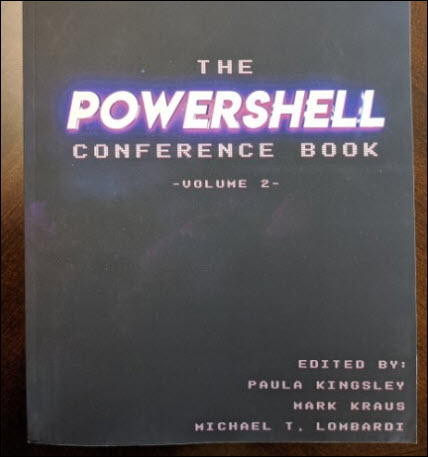
Until next time, here is a plug for The PowerShell Conference Book - Volume 2 which is an amazing collection of knowledge that everyone can learn from!
Comments