
So you’ve written a few functions in PowerShell… Now what?
Writing functions is a blast. Having a problem, spending time to come up with your own unique way to solve it, gather some information, or even get fancy and make something that works in the pipeline! It’s an awesome feeling to finally close those 32 chrome tabs of research trying to build what you’ve made, and then you move on to the next task.
After a while, it’s time to take your PowerShell game to the next level. Taking your separate functions and scripts and gather and organize them into a single module, making your code much easier to manage and distribute. Not to mention that you immediately become a professional upon making your first module, everyone knows that!
Okay, let’s get down to business. A PowerShell module is simply a collection of similar functions, with some metadata thrown in. There are many different camps on the ‘correct’ way to build a module, and each one has it’s pros and cons, as well as added complexity. We will start with the most basic and build from there.
Module Bare Necessities
A module is a PowerShell file with the .psm1 extension that contains your functions, as well as a file with the .psd1 extension that contains metadata about your module. The .psm1 file is your Module, and the .psd1 file is called a Manifest. Technically you can get away with not having a Manifest file, but it’s clunky and remember, we are professionals so we want to have a Manifest!
Say I’ve written 6 functions that all have to do with ActiveDirectory tasks, and I would like to create a module out of them to share with my teammates. That will go something like this.
You will want to gather all of the function definitions and paste them into your ModuleName.psm1 file. The file name must be your desired module name. In this example I will use the module name MyADUtils. So, let’s get our functions pasted into our MyADUtils.psm1 file like this.
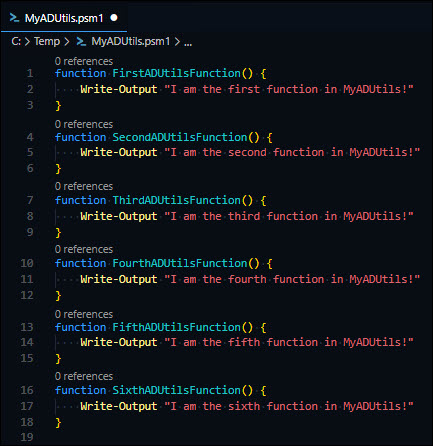 Figure 1 - Function definitions
Now that we have our functions assembled, we need to tell the module to export these functions. When you do an Import-Module ModuleName, you only import the functions that the module is told to export. For example, I can export the first-third functions of MyADUtils, and even though there are more functions defined in the MyADUtils.psm1 module, I won’t be able to use them since they were not specifically exported.
Here is how we export the functions that we want to use. At the bottom of the module, we want to use the Export-ModuleMember cmdlet and specify which -Function we want to export.
 Figure 2 - Exporting Module Functions
Notice how we can list multiple functions together, separated by commas. We can clean this up by adding a backtick to the end of each line (except the last line) and placing the next function on the next line, like this.
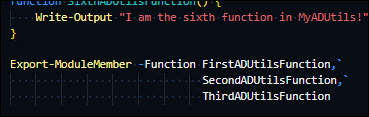 Figure 3 - Cleaner Export of Module Functions
Then we save the file and can now import this module manually like this: Import-Module path\to\module\MyADUtils.psm1
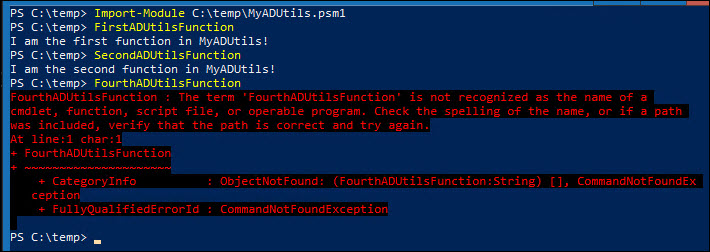 Figure 4 - Importing the Module
Notice after we import, we can use the functions that are exported successfully! Also, we are not able to use the functions in the module that aren’t exported, like FourthADUtilsFunction.
Even though the non-exported functions are not exported to be used in your current PowerShell session, they can however reference each other within the module itself. Let’s say you write a function, and it’s only purpose is to assist another function within your module, but you don’t necessarily want the user to be able to use that function. We can do something like this.
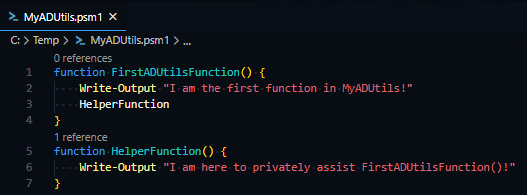 Figure 5 - Using a Private Function
Notice we are referencing the HelperFunction from inside of FirstADUtilsFunction
 Figure 6 - Public vs Private Function
Now, notice how FirstADUtilsFunction is able to call HelperFunction, but we are not able to call it from our session.
Technically we can export all of the functions in our modules like this: Export-ModuleMember -Function *, but then we do not get any control over which functions stay ‘private’ and which ones we specifically want to export.
Congratulations!! You just created and imported your own module!
 Figure 7 - Buy one get one free
Remember that Manifest (.psd1) file we talked about earlier? Here’s where we gird up our loins and become professionals.
There is a very easy way to create a module manifest file, and it only needs a couple of pieces of information to work. This shows how to use the cmdlet New-ModuleManifest to create this manifest file for you.
New-ModuleManifest -Path .\MyADUtils.psd1 `
                   -Author "Your name here" `
                   -RootModule 'MyADUtils.psm1' `
                   -Description "Functions for assisting with ActiveDirectory stuffs." `
                   -ModuleVersion "1.0.0" `
                   -FunctionsToExport "FirstADUtilsFunction",`
                                      "SecondADUtilsFunction",`
                                      "ThirdADUtilsFunction"
This will create a module manifest for you with the provided information. Notice instead of just listing what functions to export, we are able to provide a description, author name, and even a module version! This is the metadata on your module that makes you a professional module builder. Go ahead and crack open this manifest file to see all of the other types of data and values that can be provided with your module. At first, seeing all of the metadata you can provide may be overwhelming, but as you improve, you will be grateful that PowerShell has these values built-in to the manifest for you to use!
My goal is to build a module that can justifiably use every value in the manifest. For example: Now that I am able to post my code on Github publicly, I can now include the -ProjectURI property and link it to my Github repository. And as you create modules that are more complex, you will be able to use more and more of these metadata.
Let’s wrap this all up and but a bow on it!
There’s one more thing we need to do to wrap all of this up in a bow. Both the module and the manifest need to be in a folder that is named after the module.
You can look in your $env:PSMODULEPATH variable to see all of the folder locations that you can place this module folder into, but in my example, it will sit in C:\Temp like this.
C:\Temp
└───MyADUtils
    └──MyADUtils.psm1
    └──MyADUtils.psd1
To neatly expand the values in $env:PSMODULEPATH, use the following command:
$env:PSMODULEPATH -split ';'
Hopefully this sheds some light on the who, what, where, when, why’s of modules, and show you they are simpler than you think once you get the hang of it.
If you have any questions, please feel free to reach out to me.
In How to organize your powershell functions into a module - Part 2, we will be looking at a better module architecture that will help with managing your code as your module grows.
Until next time, here is a picture of my dog, Pupper. Marvel at his majesty and grandeur.

Comments